Showing posts with label recipes. Show all posts

July 20, 2014

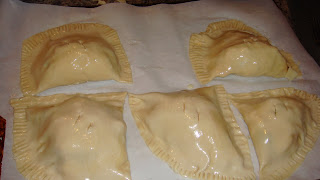
Caramel Apple Chimichangas!

Today I was in the cooking mood!  After whipping up a mean pork tenderloin with some amazing sides of mashed potatoes,  green beans, and garlic bread...dessert was on my mind!  So I pulled up Pinterest and found this awesome recipe! http://jcocina.com/apple-cinnamon-dessert-chimichangas-autumn-apple-party-for-sundaysupper/

May 27, 2010

Triple Fudge Crunch Cake

So it's no secret that I LOVE chocolate and any excuse to bake something really:)  I decided since it was Sunday and we were all in the mood to snack that I'd try out a new cake recipe.  When Phil saw the ingredients he cringed and said, "I'm out"...so I warned him not to judge a recipe by the ingredients:) 

I think it's safe to say...he ate his words...literally!  The cake is super yummy and is definitely a crowd pleaser!

Here's what you need...
1/3 Cup Sweetened Condensed Milk
1 bag Milk Chocolate Chips
1 package Fudge or Milk Chocolate Cake Mix, I use Betty Crocker
1/2 Cup Vegetable Oil
1 Cup Applesauce
2 Eggs
1 Cup Chopped Pecans

To Start:  Heat your oven to 350.  Grease the bottom only of a 13X9 pan.
Next, Microwave the condensed milk and half a cup of the chocolate chips in a small microwaveable bowl uncovered on Medium (50%) in 30 second intervals until the chocolate is softened; stir until smooth and set aside.
Now for the cake part:  Beat cake mix and oil together with a mixer or your kitchenaide, just until it turns crumbly; scoop out 1 cup of that mixture and set it aside...Now add the applesauce and eggs into the remaining cake mixture, the mixture will seem thick and grainy, just continue to beat for about 2 minutes or so then spread it into your pan.
Drop melted chocolate mixture in tablespoons onto the cake batter. 
Grab that cup full of crumbly cake bits and add it to another 1/2 cups of chocolate chips and the pecans.  Just mix with your hands until it's "topping" worthy:)  Crumble the mixture all over the cake batter, then bake it for 45-50 minutes or until the center is set.
Cool completely or serve hot with ice cream...it's super yummy!
Sorry my photos aren't better...I only had my phone camera handy:)

January 23, 2010

Chocolate Lava Cups


I was really in the mood for some "Lava Cups"...atleast that's what I call them.  I couldn't find a recipe off at hand, so I decided to start with my favorite 3 ingredients...Chocolate Cake Mix, Chocolate Jello, and Chocolate!  How can you go wrong, right? 

I mixed the pudding in with the cake mix and baked the cake like the directions called for...then I made up the "ganache" type filling for the middle.  I melted 1 box of the Baker's Semi Sweet squares over medium heat with 1/4-1/2 cup heavy whipping cream until it all melted together and became creamy.  Then I poured it into a bowl and stuck it into the fridge for a half hour or so.

When the chocolate was hard enough, I scooped it out with a tablespoon and dropped it in the middle of my little cupcakes...(I used a mini cheesecake tin).

I baked them at 350 for the lenght it said on the box...which I think was about 20-22 minutes.  Then I took them out of the pans to cool for just a few minutes, while I heated up the remaining chocolate in the microwave.  (Make sure you heat it slowly...otherwise it will scorch)  After it was all melted, I placed a Lavacup and a scoop of ice cream on everyone's plate...then topped with melted chocolate!  I see I was overly excited to eat it...so I guess I left out the shot of the ice cream.  I guess if you want to see what it looks like, you'll have to try it out for yourself!  What a bummer;)

So if you're in the mood for something chocolatey...this definitely does the trick!

January 14, 2010

Creamy Dreamy Blueberry Muffins


I've recently been getting some requests to post this recipe...so here you go!

Okay, so everyone that knows me, knows I'm a sucker for "Starbucks Tuesday"...declared by Phil a few years ago, when he started bringing me home a Grande Hot Chocolate and Blueberry muffin EVERY Tuesday morning from Starbucks, before leaving for work! It's one of a few "cheesy" things we do around here to let eachother know we still "like" eachother:) ANYHOO...It's the best...or WAS until our Starbucks started skimping on the quality of their muffins! Seriously! They changed their recipe and now I'm just a fan of their cocoa:( So I decided to make my own Blueberry Muffins!

Phil is used to these random "cooking missions" I seem to embark upon, even if dinner was placed on the "back burner"...so we could enjoy some great blueberry muffins for dessert! It makes about a dozen regular sized muffins and FYI...only about 6 of the king sized ones:) **WARNING** These muffins are EXTREMELY ADDICTIVE, and NOT a compliment to ANY diet...unless it's the "SEE FOOD" diet:)


1 Cup Sugar
2 Eggs
1 stick softened butter
8 oz softened cream cheese
2 Tablespoons Lemon Juice
2 Teaspoons Vanilla
1 3/4 Cups all purpose flour
1 Teaspoon baking powder
1 Teaspoon baking soda
1/2 Teaspoon salt
1 Package Instant Vanilla Pudding (small)
2 Tablespoons Sugar
12-16 oz Fresh Blueberries
2 Cups Heavy Cream
1/2 Cup Powdered Sugar


CRUMB TOPPING:

1/3 c. butter
1/2 c. sugar
3/4 c. flour

1. Preheat your oven to 350 degrees. Then place your berries in a bowl and coat with the 2 tablespoons of sugar. Stir to make sure that the berries are coated in sugar. Set aside.

2. In a stand or electric mixer cream the butter, cream cheese, vanilla, salt and sugar, until well combined. Then slowly add the remaining ingredients (baking powder, baking soda, salt, eggs, flour, and ending with the pudding mix. After everything is combined, the mixture will seem dry.

3. Slowly begin adding approximately 1/3-1/2 cups Heavy Cream to the batter, until it is the consistancy of thick pancake batter.**Depending on how you like your berries, you can either choose to mix them in now or wait and press them into the tops of the muffins next...

4. Fill 6 King Sized muffin tins or 24 regular size tins with muffin batter, about ¾ full, that has been greased or sprayed with cooking spray. If you haven't already added them, press 5-6 berries into tops of each unbaked muffin.
Bake for 23-28 minutes or until golden brown on top and cooked through. Remove and let cool.


5. Using the same bowl that the berries were in, place the powdered sugar and a few tablespoons of heavy whipping cream. Hand whisk the cream and sugar until the consistency of syrup, if too dry add more whipping cream, if too "liquidy" add more sugar. Whisk until smooth and RUNNY consistency; Pour over the top of muffins, while they are still warm.


6. Using another bowl...combine the butter, sugar, and flour for the CRUMB topping using an electric mixer, until ingredients look uniformly like crumbs! Sprinkle this mixture on top of the whipped cream drizzle! Simply delicious!!!!

December 7, 2009

Peppermint goodies...TO GO!

This week has been a week of baking and creating for everyone! My kids LOVE to drop off "goodies" at people's houses! It's the highlight of December every year for them, which is great, because they motivate me to stay busy in the kitchen. How can you ignore..."Mommy, can we take these to other people's houses to share? Can I take it to their door?" So this year I found a few recipes that I really wanted to try out and I couldn't decide which ones I liked best...so we just put them ALL on a plate!

First I made the "Peppermint Bark"...which was probably my favorite to make! It was SUPER simple and took me only about 10 minutes from start to finish! I melted white chocolate chips in the microwave, while that was being melted, I crushed 5 candy canes in a baggy. After the chips were melted, I poured them onto a strip of foil and then sprinkled them with the candy cane pieces! Doesn't it look so festive!?! After a few minute it hardens enough that you can transport it to your freezer. Let it cool for about 3 minutes in the freezer, then remove it from the foil and begin the fun part! Breaking it all apart! It makes a ton and is a super yummy simple gift! You can even try different flavors of candy cane, if you're not a huge "mint" fan!

Then I created my own version of a mint brownie. I couldn't find the Candy Cane Kisses this year:( So instead of those, I used the "Andes Mint" Hershey candies, and instead of making them bite sized...I made them cup cake sized! It probably would have been delicious the other way too...but this is what I did.

I prepared 2 packets of the Costco brownie mix, then filled each cup only about 1/2 way full. Then I added 1 Hershey piece to each cup, and pressed it down just a bit. I then placed them in my preheated oven at 350 degrees for approximately 25-30 minutes. I let them cool competely, then you could just make your own ganache using chocolate chips and cream...but I opted for the super simple, Baker's dipping Milk Chocolate tub. I just popped it in the microvave at 30 second intervals until it became smooth and creamy. Then I just grabbed each brownie/cupcake and dipped it into the chocolate and then sprinkled them with the left over crushed candy canes!

December 2, 2009

Christmas Goodies...

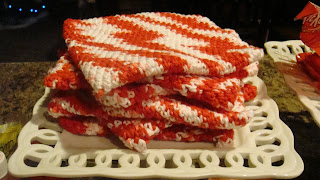
My mom learned how to crochet pot holders a few days before she flew in last month for Madison's hospital stay...so she showed me how too! I have to admit, it's kind of addicting! So, since I now have a bunch of red and white pot holders...I decided I would give some out as gifts:) Watch out! Some of you might just win the pot holder lottery! Lucky you! Ha Ha! I wanted something else to go with the potholders too...I know, I know, what can be better than a pot holder, right?
Well, I got this idea off of "bakerella's blog" a couple of months ago and decided to turn them into
"Christmas Cowboy Cookies" in a jar.

I got these cute label free jars at Hobby Lobby. Then I layered the ingredients in like this:

Flour (1 1/3 Cup)
Baking Soda (1 Tsp)
Baking Powder (1 Tsp)
Salt (1/4 Tsp)
Cooking Oats (1 Cup)
M&M's (3/4 Cup)
Chocolate Chips (3/4 Cup)
Brown Sugar (1/2 Cup)
White Sugar (1/2 Cup)
Chopped Pecans (1/3-1/2 Cup)

I had to really pack it down, but it fit perfectly! If you're not a "nut" fan, use extra M&M's or Chocolate Chips!

If you want to see how CUTE hers turned out then click here!

I'll attach a card or label that tells them to "Mix with 1 slightly beaten egg, 1/2 cup slightly melted butter, and 1 Tsp Vanilla"!

Phil's comment: "It's not that great of a gift, because you're making them do all the work." Classic! That's my guy:)

November 22, 2009

Pumpkin Spice Roll...


I was in the mood to bake something yummy...but didn't want to go the store to get stuff. I'm sure you're all aware of that feeling, right? Or...maybe I'm just lazy! Anyway I decided to make the pumpkin cookies I made a while back, into a roll! The frosting was super yummy, and the cookies were really cake like already, so I decided to try it out!

I used the exact same recipe...didn't change a thing except, instead of dropping it by rounds on to a cookie sheet, I spread it out onto a lined jelly roll pan! I baked it for around 20 minutes (when a toothpick came out clean) and then immediately flipped it onto a towel dusted with powdered sugar and rolled it up!

I placed it on my wire rack to cool...but it was taking FOREVER to cool off! I know you're supposed to wait for it to be COMPLETELY cool before unrolling it...but I couldn't wait AND Phil was really getting impatient too. Soooo, I unrolled it early. You can see how it has a few cracks in it...but to be honest, our stomachs didn't care! It was delicious! So if you happened to try those cookies, it tasted like those only in a rolled up frosted way! So now I know that recipe works for both...Mission Accomplished.

October 23, 2009

Chicken Cordon Bleu...Mini Pies


So on my way out the door to pick up the kids yesterday, I saw a 30 second commercial for Rachel Ray, advertising a unique variation of a meat pie she would be making later on her show. I thought it sounded kind of good, but totally forgot to tune in for the recipe! Ha Ha! That's totally my life for you!

Anyway, I found myself thinking that there really are a bunch of things you can stuff within a pie crust and have it taste good! So after thinking of several different combinations...all I'm sure could be yummy with the right twist, I settled on Chicken Cordon Bleu...or a version of it anyway!

This recipe makes more than enough for 8! You could also cut the "pies" to be smaller if you wanted!

Ingredients:

4 Cups Rice-(I used Minute Rice and I cooked it using chicken broth instead of water)
Broccoli (washed and chopped)
Chicken Breasts-(I boiled 4 chicken breasts boneless/skinless, then shredded them)
Swiss Cheese (I shredded an 8 oz block)
"Sauce"
1 cube butter
3 cubes chicken bouillon
(Melt these together over medium heat. Then add about 1/4 cup flour, or just enough to make the mixture thick. Slowly add either cream or whole milk...I use half of each. I think I probably used anywhere from 4-6 cups total. (You may have to add more or less depending on how much flour you added earlier.) Make sure you are stirring constantly and allow it to simmer for a minute or two to thicken up. It should NOT be "runny", a thick liquid without any chunks! Feel free to add salt and pepper or other seasonings as you see fit:)

Pie Crust- You Can make your own...or just go to the store and pick up a few of these.

Each box contains 2 pie crusts, (which will make 4 good sized "pies".) Roll them out, 1 at a time to make basically a thinner bigger circle than provided. Once it's been rolled out, cut it in half. (I used a pizza wheel)

Now that you have all your ingredients ready and waiting to be layered...place the two halves on a covered baking sheet.

I made the "executive" decision to place the rice on the bottom, followed by broccoli next.
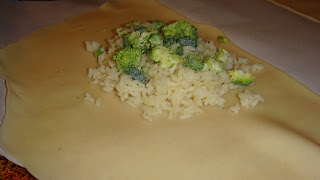
Then I added the chicken...

Followed by the sauce...

Then topped with cheese!I'm such a visual person...so sorry for the "play by play"...so to speak!

Now just fold it over and seal it with a fork. Make sure there isn't any food near the edges or it won't seal properly.

Then give them a little brush with egg mixture (2 egg whites and a tablespoon of water) You don't need a fancy brush either...use your fingers if you need to!

Make sure to cut a few small slits in their tops, to allow them to vent:)

Place them in a 400 degree pre-heated oven for approximately 20 minutes or until they're brown and bubbly looking!

They lift off easily with a spatula and literally take up an entire plate! Serve and enjoy!
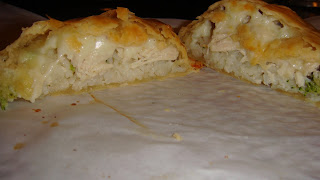

I think I'll be trying different variations of these things over the next couple weeks! Let me know if anyone tries another combination! I would love some ideas!